Switchport Analyzer (SPAN) এর মাধ্যমে Network এর traffic monitoring করা হয়। অনেক সময় security purpose এ ডিভাইস এর ভিতর দিয়ে কি data send/received হচ্ছে, Source address, Destination address কি তা Monitor করার প্রয়োজন হয়। Normally, Switch port এর ভিতর দিয়ে ডাটা পাস হওয়ার সময় ডাটাকে Monitoring করা যায় না। এখানে SPAN Technology ব্যবহার করে Layer2 topology তে Traffic Monitoring করা যায়।
Topology Overview :
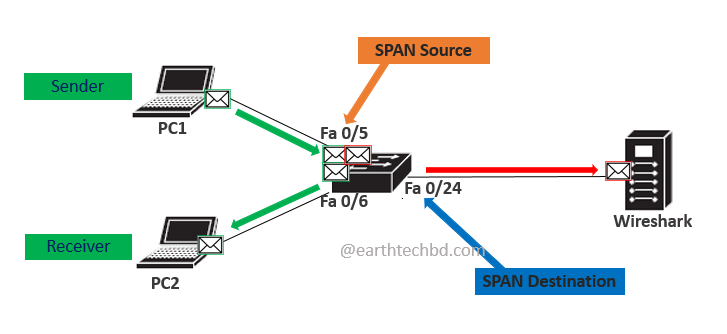
Network এর Traffic monitoring এর ক্ষেত্রে Packet capture & analyze করার জন্য Capturing tool ব্যবহার করা হয়। একইভাবে, Voice call এর ক্ষেত্রে call recording tool ব্যবহার করা হয় । এই Capturing tool গুলো একটি Server এ run করে ডাটা Traffic capture, analyze এবং প্রয়োজনে Store করা হয়। Capturing tool কানেক্টেড পোর্টকে SPAN Destination port, এবং যে পোর্টগুলোর ডাটা Capture করা হবে ওই পোর্টগুলোকে SPAN Source port হিসাবে Configure করা হয়। ডাটা analysis এর উদ্দেশ্যে Source port এর ডাটা গুলোকে copy করে SPAN Destination port এ পাঠানো হয়, যেখানে Monitoring tool connect আছে। যেহেতু SPAN source port এর data copy হয় এ জন্যই একে port mirroring ও বলা হয়।
উপরের চিত্রে, SPAN source port Fa0/5 এর মধ্য দিয়ে send/receive হওয়া প্রতিটি traffic কে copy করবে এবং SPAN Destination port Fa0/24 এ পাঠাবে।
SPAN Source port এর বৈশিষ্ট্য সমূহ :
- Normally, একটি Single physical port হতে পারবে ।
- একটি Ether Channel /port Channel হতে পারবে ।
- VLAN কে Source port হিসেবে Configure করা যাবে ।
- Trunk port কে Source port হিসেবে Configure করা যাবে ।
NOTE: SPAN Destination port একইসাথে SPAN Source হতে পারবে না ।
SPAN Destination port এর বৈশিষ্ট্যসমূহ :
- Mainly, একটি Single physical port হতে পারবে ।
- কোন Ether Channel/port Channel হতে পারবে না।
- SPAN Source port একইসাথে SPAN Destination হতে পারবে না
- Ether Channel group থেকে একটি Single port কে SPAN Destination port হিসেবে কনফিগার করলে Physical port টি Channel group member থেকে Remove হয়ে যাবে।
NOTE: By default, SPAN Destination port দিয়ে Only monitoring traffic send হবে, কোন Data traffic send/receive হবেনা। SPAN Destination port কে কোন Source হতে communicate করা যায় না. একইভাবে SPAN Destination port থেকেও communicate করা যায় না । কারণ SPAN Destination port এর “line protocol down” থাকে । কোন Layer2 protocol এর মেসেজ send/receive হবেনা ,Port টি কোন VLAN এর member হিসাবেও থাকবে না।
Type of SPAN:
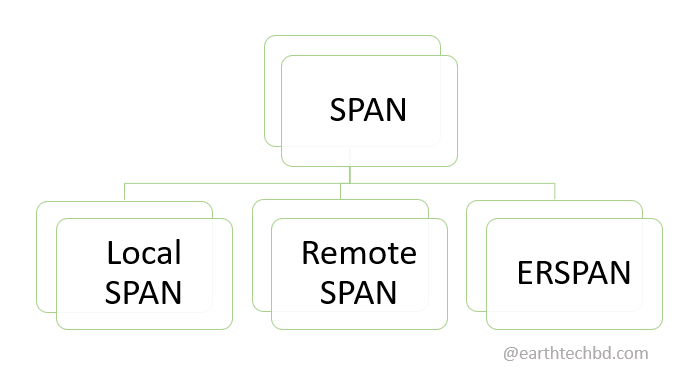
Local SPAN: যদি SPAN Source এবং SPAN Destination একই Switch এ connect থাকলে তাকে Local SPAN বলা হয় ।
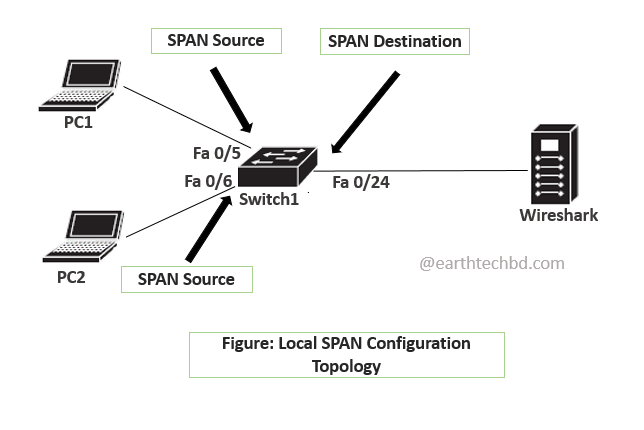
উপরের চিত্রে, SPAN Source Fa0/5 ও Fa0/6 এবং SPAN Destination Fa0/24 একই Switch এর অন্তর্গত ।
SPAN Source port এ কোন Direction এর packet capture করবো তা predefined করতে হবে ।
SET Direction of Packet Capture :

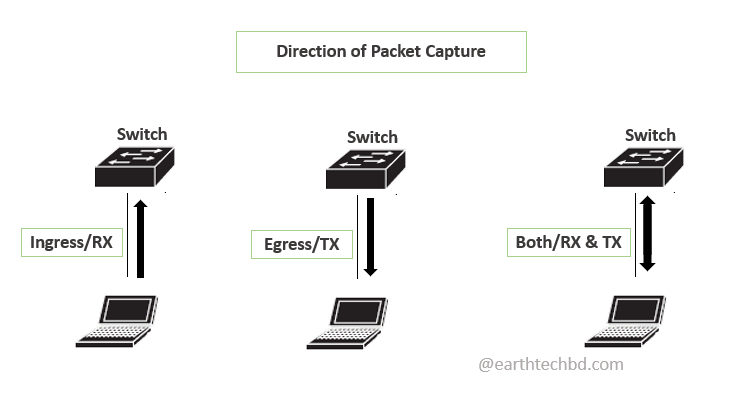
RX :- Only Ingress/Receive traffic গুলোকে Capture করবে।
TX :- Only Egress/Send traffic গুলোকে Capture করবে।
BOTH :- Ingress & Egress উভয় traffic গুলোকে Capture করবে।
NOTE: যদি কোন Direction set না করি তাহলে By default ‘BOTH’ Direction কাজ করবে।
Configuration for Switch1 step by step :
1.Configure the SPAN Source Ports/VLANs.
Switch1(config)# monitor session 1 source interface fa 0/5
Switch1(config)# monitor session 1 source interface fa 0/6
Command for vlan: Switch1(config)# monitor session 1 source vlan 20
- Configure the SPAN Destination Port.
Switch1(config)# monitor session 1 destination interface fa 0/24
NOTE: এখানে Single Session এর জন্য Session number একই থাকবে।
Verifying Command:
show monitor
show monitor session 1
REMOTE SPAN:- SPAN Source এবং SPAN Destination different Switch এ connect থাকলে তাকে Remote SPAN বলা হয় । SPAN Source port গুলো multiple switch এ থাকতে পারে । এখানে layer2 network এ different switch এর মধ্যে Trunk link এর উপর দিয়ে Remote VLAN ব্যাবহার করে Monitoring data travelling করানো হয়।
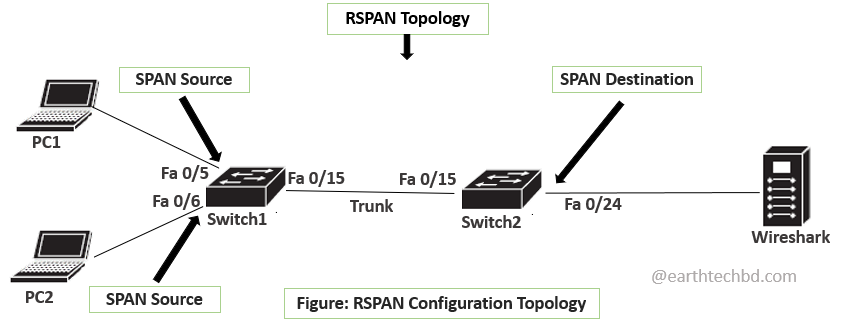
Work Process :- উপরের চিত্রে, Switch1 এর Fa0/5 ও Fa0/6 SPAN source port। Switch2 এর Fa0/24 SPAN Destination port। Switch1 ও Switch2 কে পরস্পর trunk link Fa0/15 দিয়ে connect করতে হবে । প্রতিটা Switch এ same Remote SPAN VLAN create করতে হবে। Remote SPAN VLAN, capture data কে carry করে SPAN destination এ পৌছে দিবে।
NOTE: সব Switch এ Remote SPAN VLAN একই হবে । Remote SPAN VLAN এর ক্ষেত্রে কোন Access port এর প্রয়োজন নেই ।
Switch1 এর ক্ষেত্রে SPAN source হবে Fa0/5 ও Fa0/6 । এবং SPAN Destination হবে Remote VLAN 100। এখানে Remote VLAN 100 Data কে copy করে trunk link দিয়ে Switch2 তে পৌছাবে। Switch2 এর SPAN source হবে Remote VLAN 100 এবং SPAN Destination হবে Fa0/24। Fa0/24 এ Wireshark connect আছে ।
Configuration for Switch1 step by step :
- Configure the Remote SPAN VLAN for Crrrying of SPAN traffic.
Switch1(config)# vlan 100
Switch1(config-vlan)# remote-span - Configure the RSPAN Source Ports & Destination VLANs.
Switch1(config)# monitor session 1 source interface fa 0/5
Switch1(config)# monitor session 1 source interface fa 0/6
Switch1(config)# monitor session 1 destination remote vlan 100 - Also Configure Trunk.
Switch1(config)# interface fa 0/15
Switch1(config-if)# switchport mode trunk 15
Configuration for Switch2 step by step :
- Configure the Remote SPAN VLAN for Receiving of SPAN traffic.
Switch2(config)# vlan 100
Switch2(config-vlan)# remote-span - Configure the Reception of RSPAN Traffic.
Switch2(config)# monitor session 1 source remote vlan 100 - Configure the RSPAN Destination Port.
Switch2(config)# monitor session 1 destination interface fa 0/24 - Also Configure Trunk.
Switch2(config)# interface fa 0/15
Switch2(config-if)# switchport mode trunk 15
Verifying Command:
show vlan remote-span
show monitor
show monitor session 1
Have Any query Please feel free to ask by Comment Below


